
How I Photograph and Quick-Edit Photos for Shop Listings (in just 5 steps)
Hey guys! Hopping on to do a quick tutorial on how I shoot and edit my paintings for my shop listings without any fancy equipment, just using my iPhone and Photoshop. Most definitely not a photoshop pro, but this is the technique I've found works best for me, and is SUPER simple-- hope it can help you guys too!
STEP 1: your setup.

Create your makeshift set-up with the artwork on a white background in natural daylight.
If your walls are white, and your artwork is wired to hang, by all means go ahead and hang it on the wall to photograph. I usually wait to wire my pieces (a bad habit) so most often shoot my paintings laying flat and shooting above.
I use a large white canvas for my backdrop, but a white poster board would work great too if it is large enough for your artwork. And I stand on a chair to be able to get a good straight-on angle.
TIP: you can see in this photo, I've used a foam core poster board to be a makeshift reflector, to help even out the light. (Not totally necessary for listing photos -- even lighting is much more crucial for making archival reproductions) but without it the side furthest from the light source/window would be a little more shadowed. The light bounces/reflects off the poster board and lightens up that side just a touch. The foam core is also nice to use because it is rigid, so easier to stand -- it is resting against another chair in this photo.

STEP 2: take the shot.
Take the photograph! Try to get as straight-on/straight-above as possible.
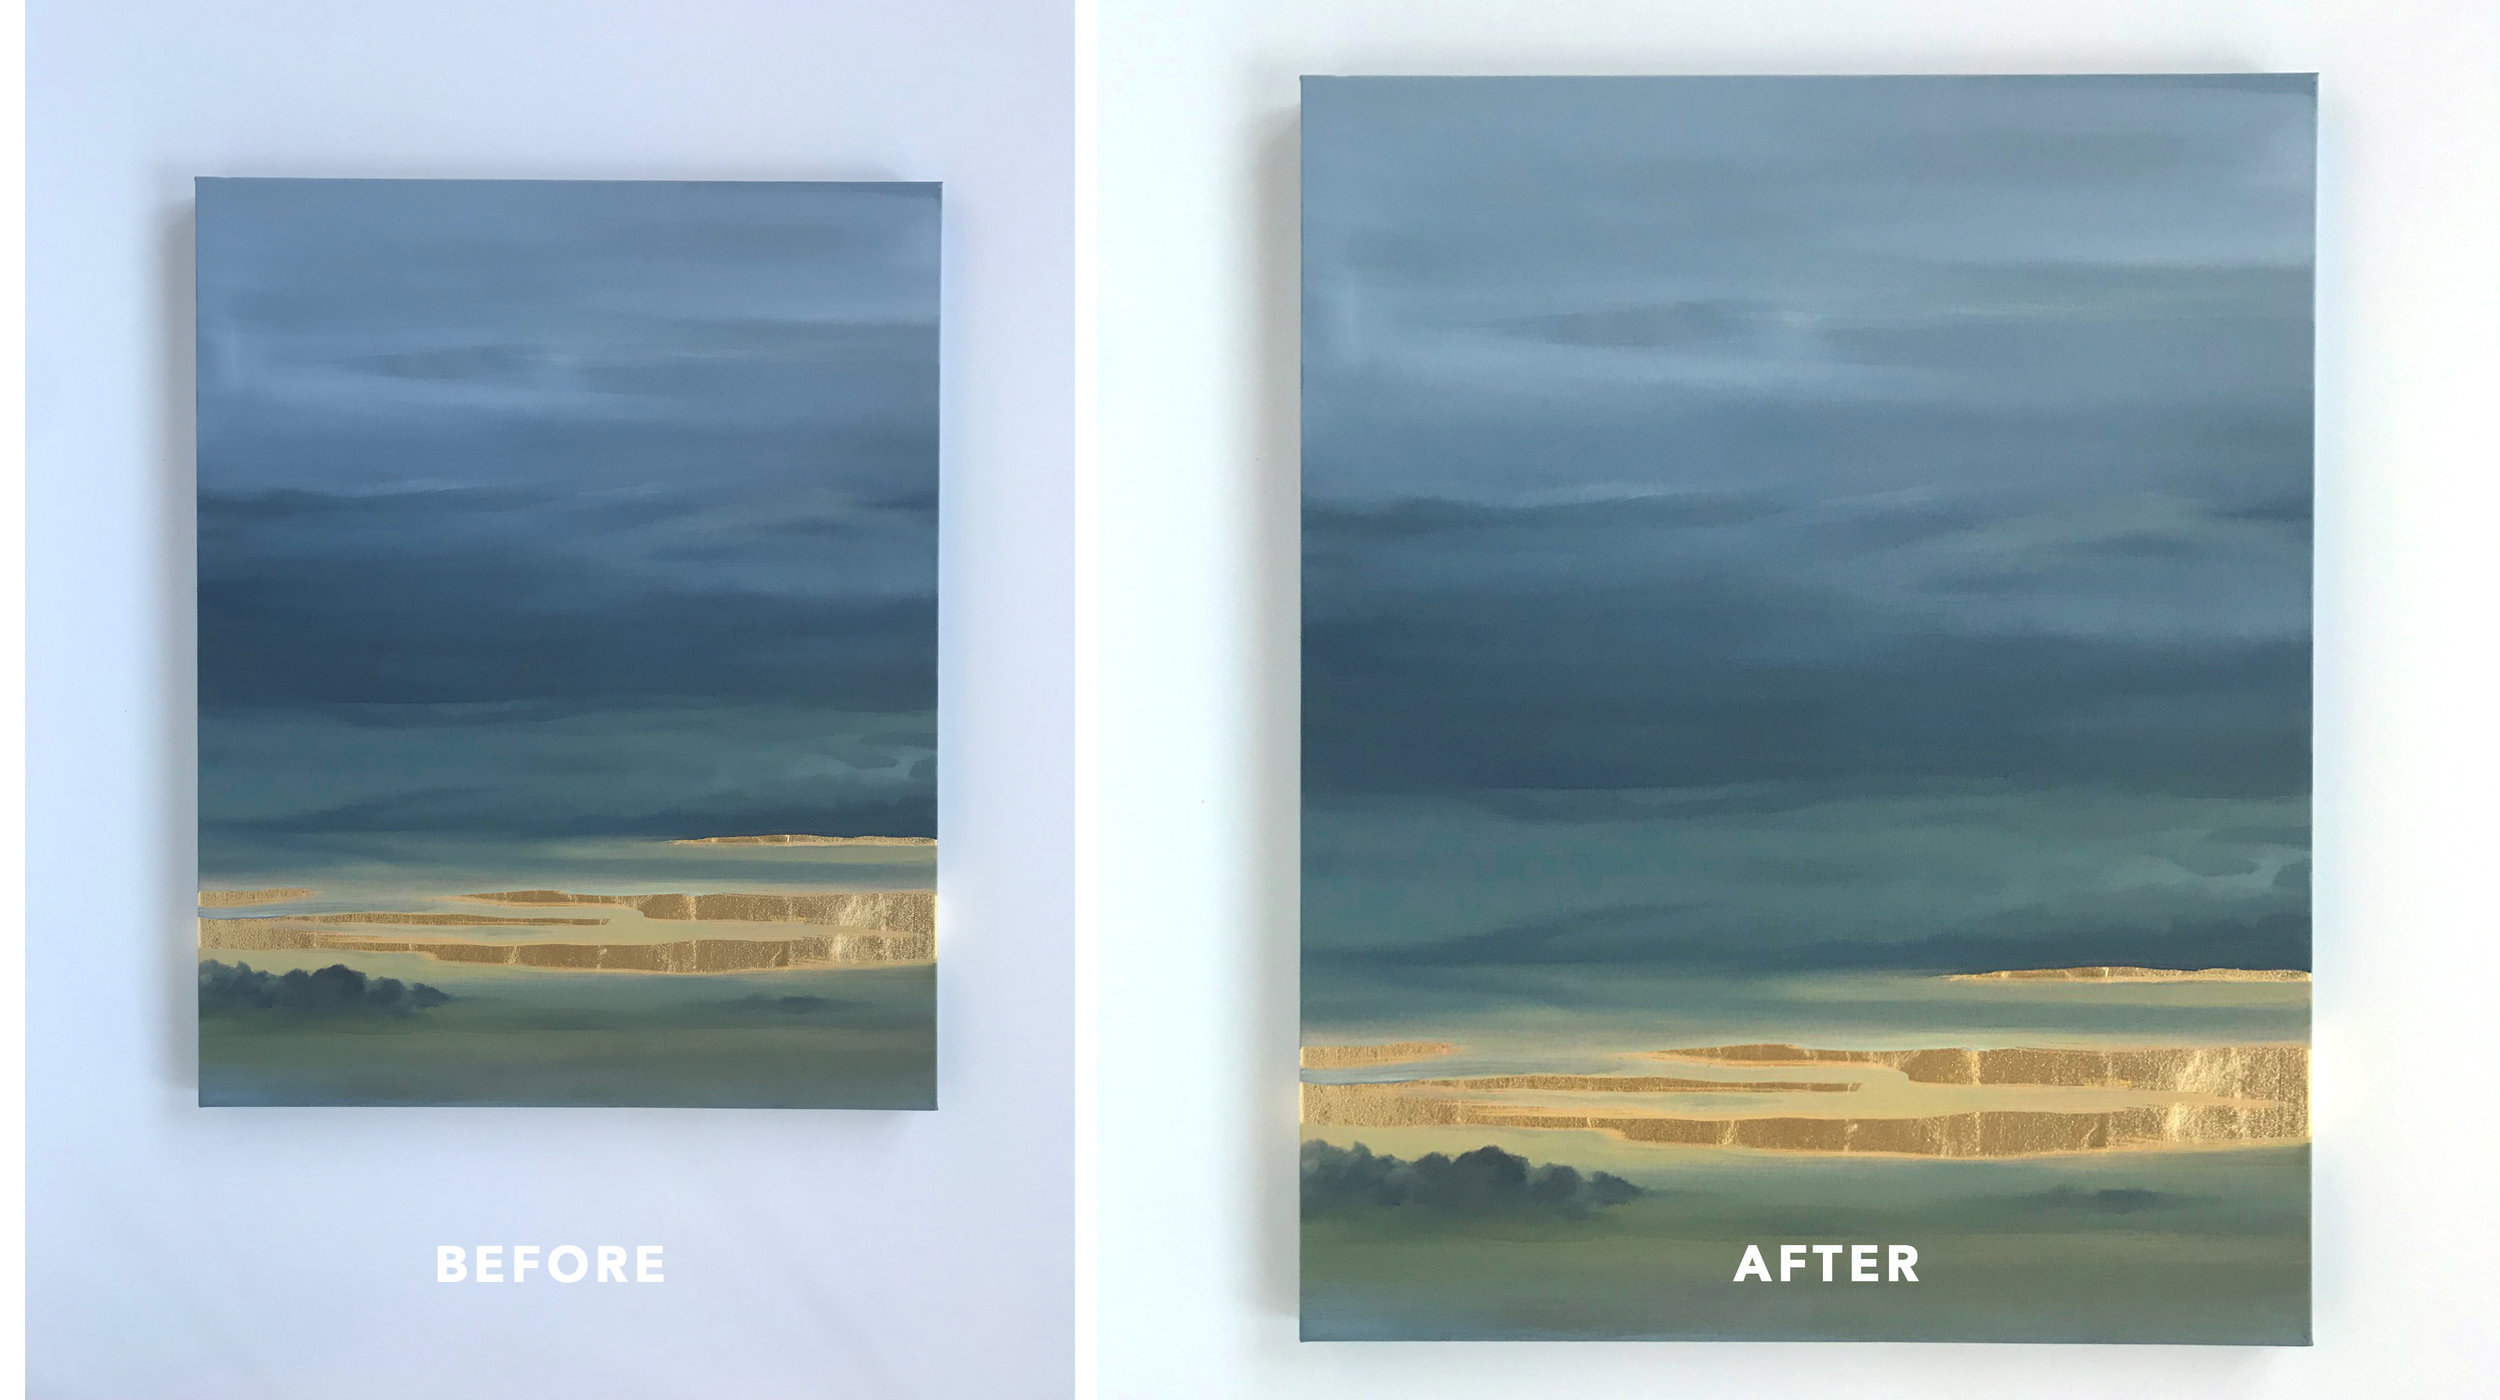
You can see on the image to the right, there is a pretty harsh cool cast on the piece, and the painting is not precisely square. We will tweak the perspective and adjust the color balance in the next step.
TIP: If you're shooting multiple pieces of art at once, go ahead and batch work -- take all photos at once, and then edit all at once. Also handy to have a helper for this step, to place each painting so you don't have to hop on and off the chair.
STEP 3: perspective warp.
This step will adjust the perspective just enough to make sure your painting/artwork is exactly square. (This step can be avoided if you use a tripod that is precisely angled and level -- but who has time for that when your days/hours from a collection launch ;)
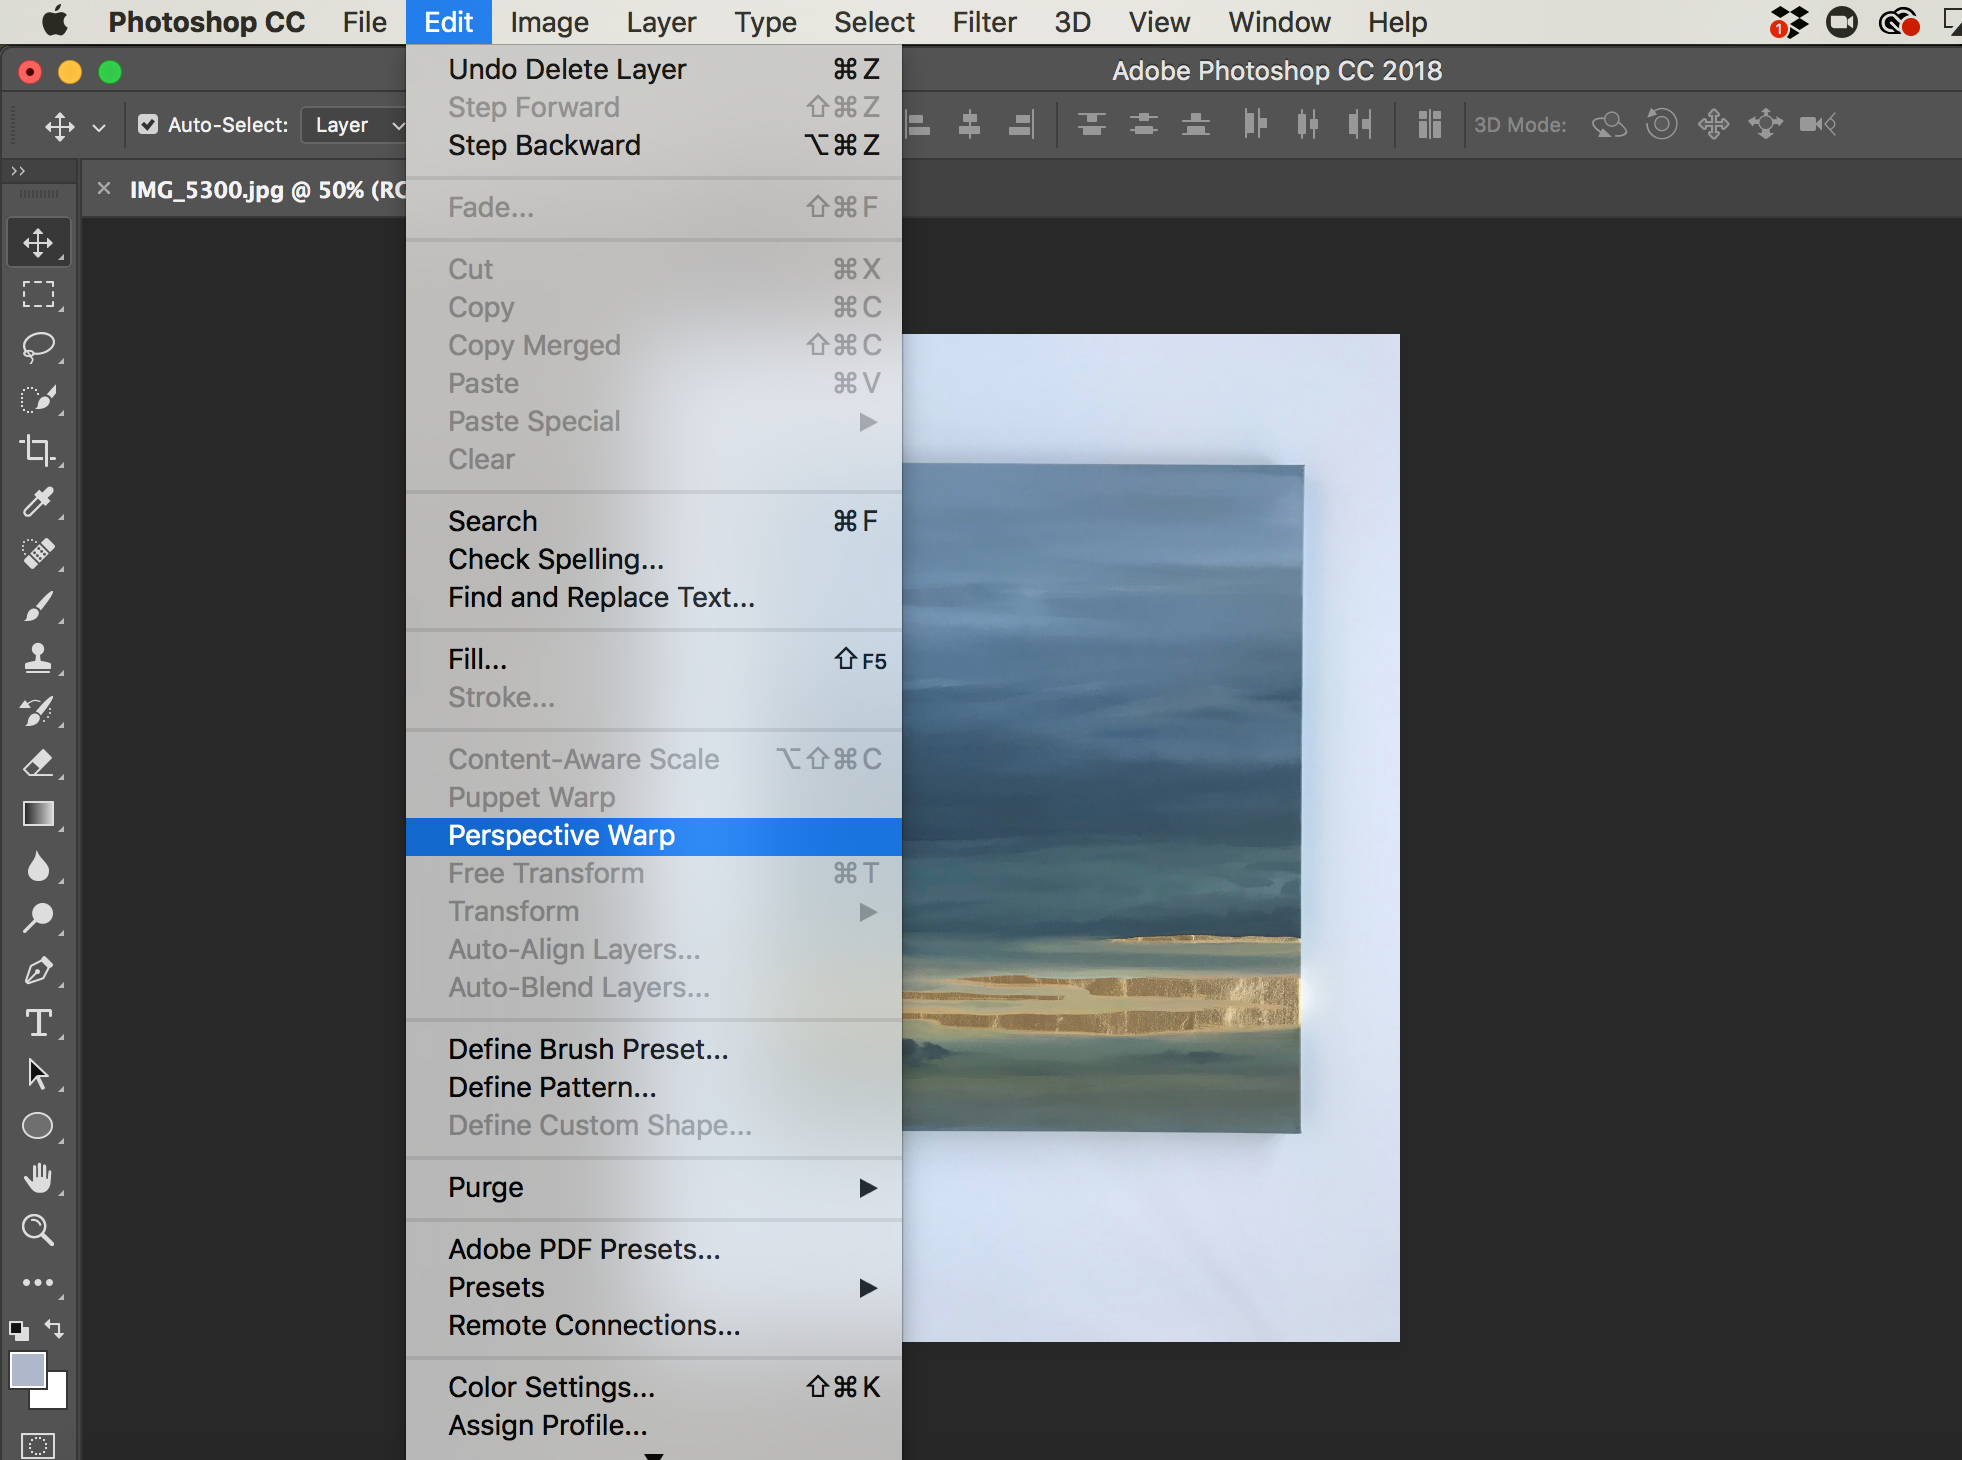
EDIT ---> Click "Perspective Warp"

Click on the top left corner of your artwork, then drag each corner of grid to meet the corner of your artwork.
Press ENTER to lock-in grid.
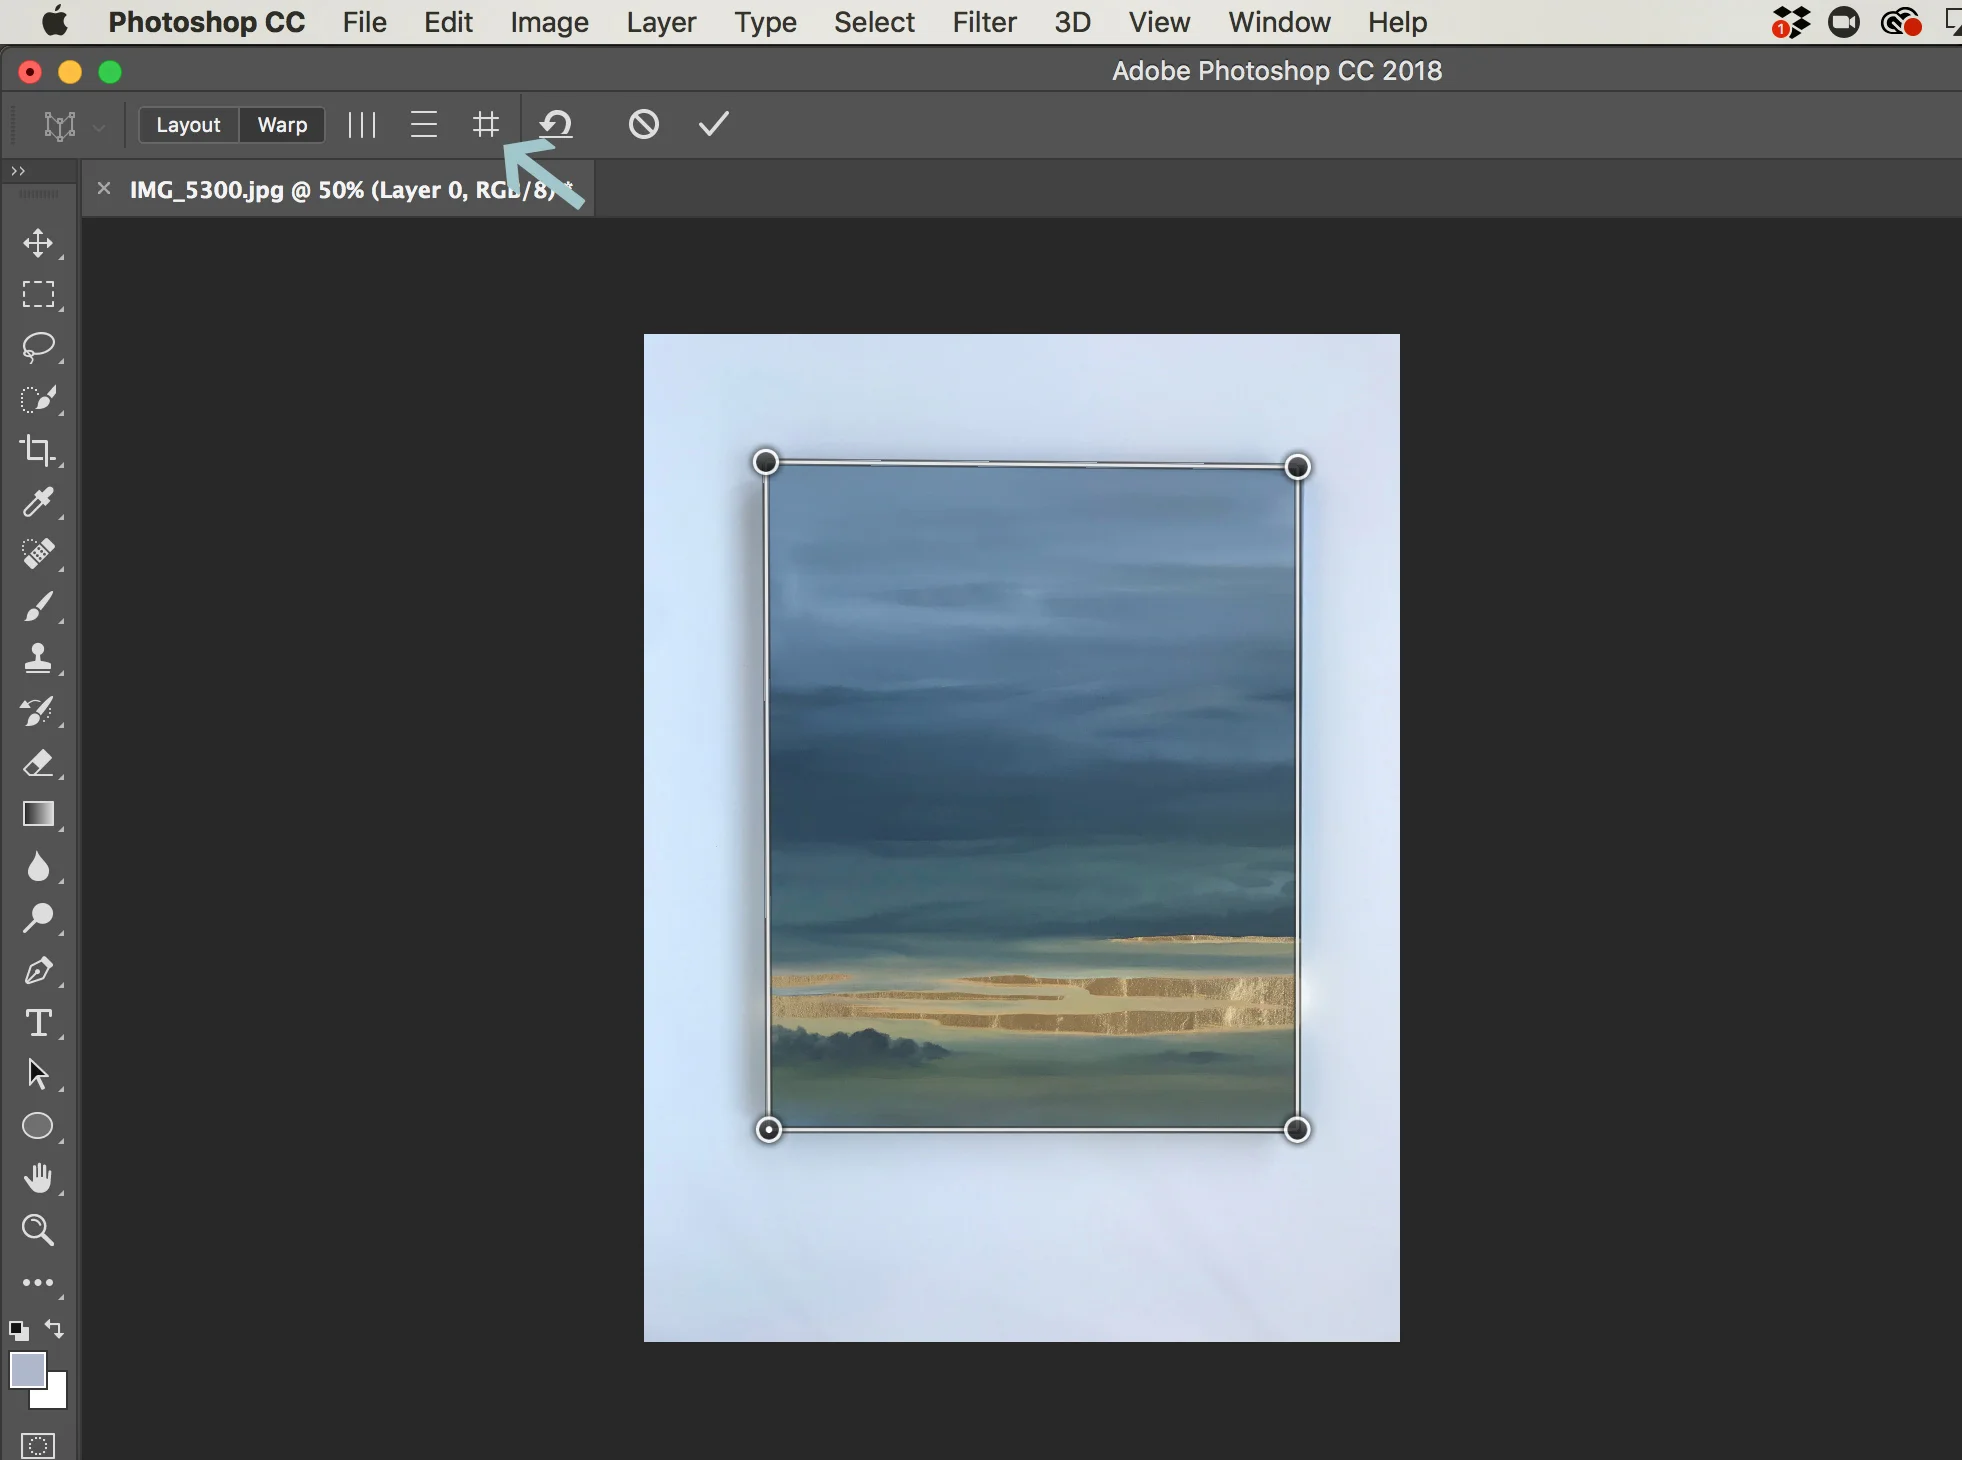
Once your artwork is outlined and the grid is locked, click on the Tic-Tac-Toe symbol at the top tool bar (where the blue arrow is pointing) This will "AutoWarp to Horizontal and Vertical" meaning it will automatically adjust the image so that all angles are 90 degrees and perfectly square -- its a subtle shift, but makes a big difference!
STEP 4: crop.
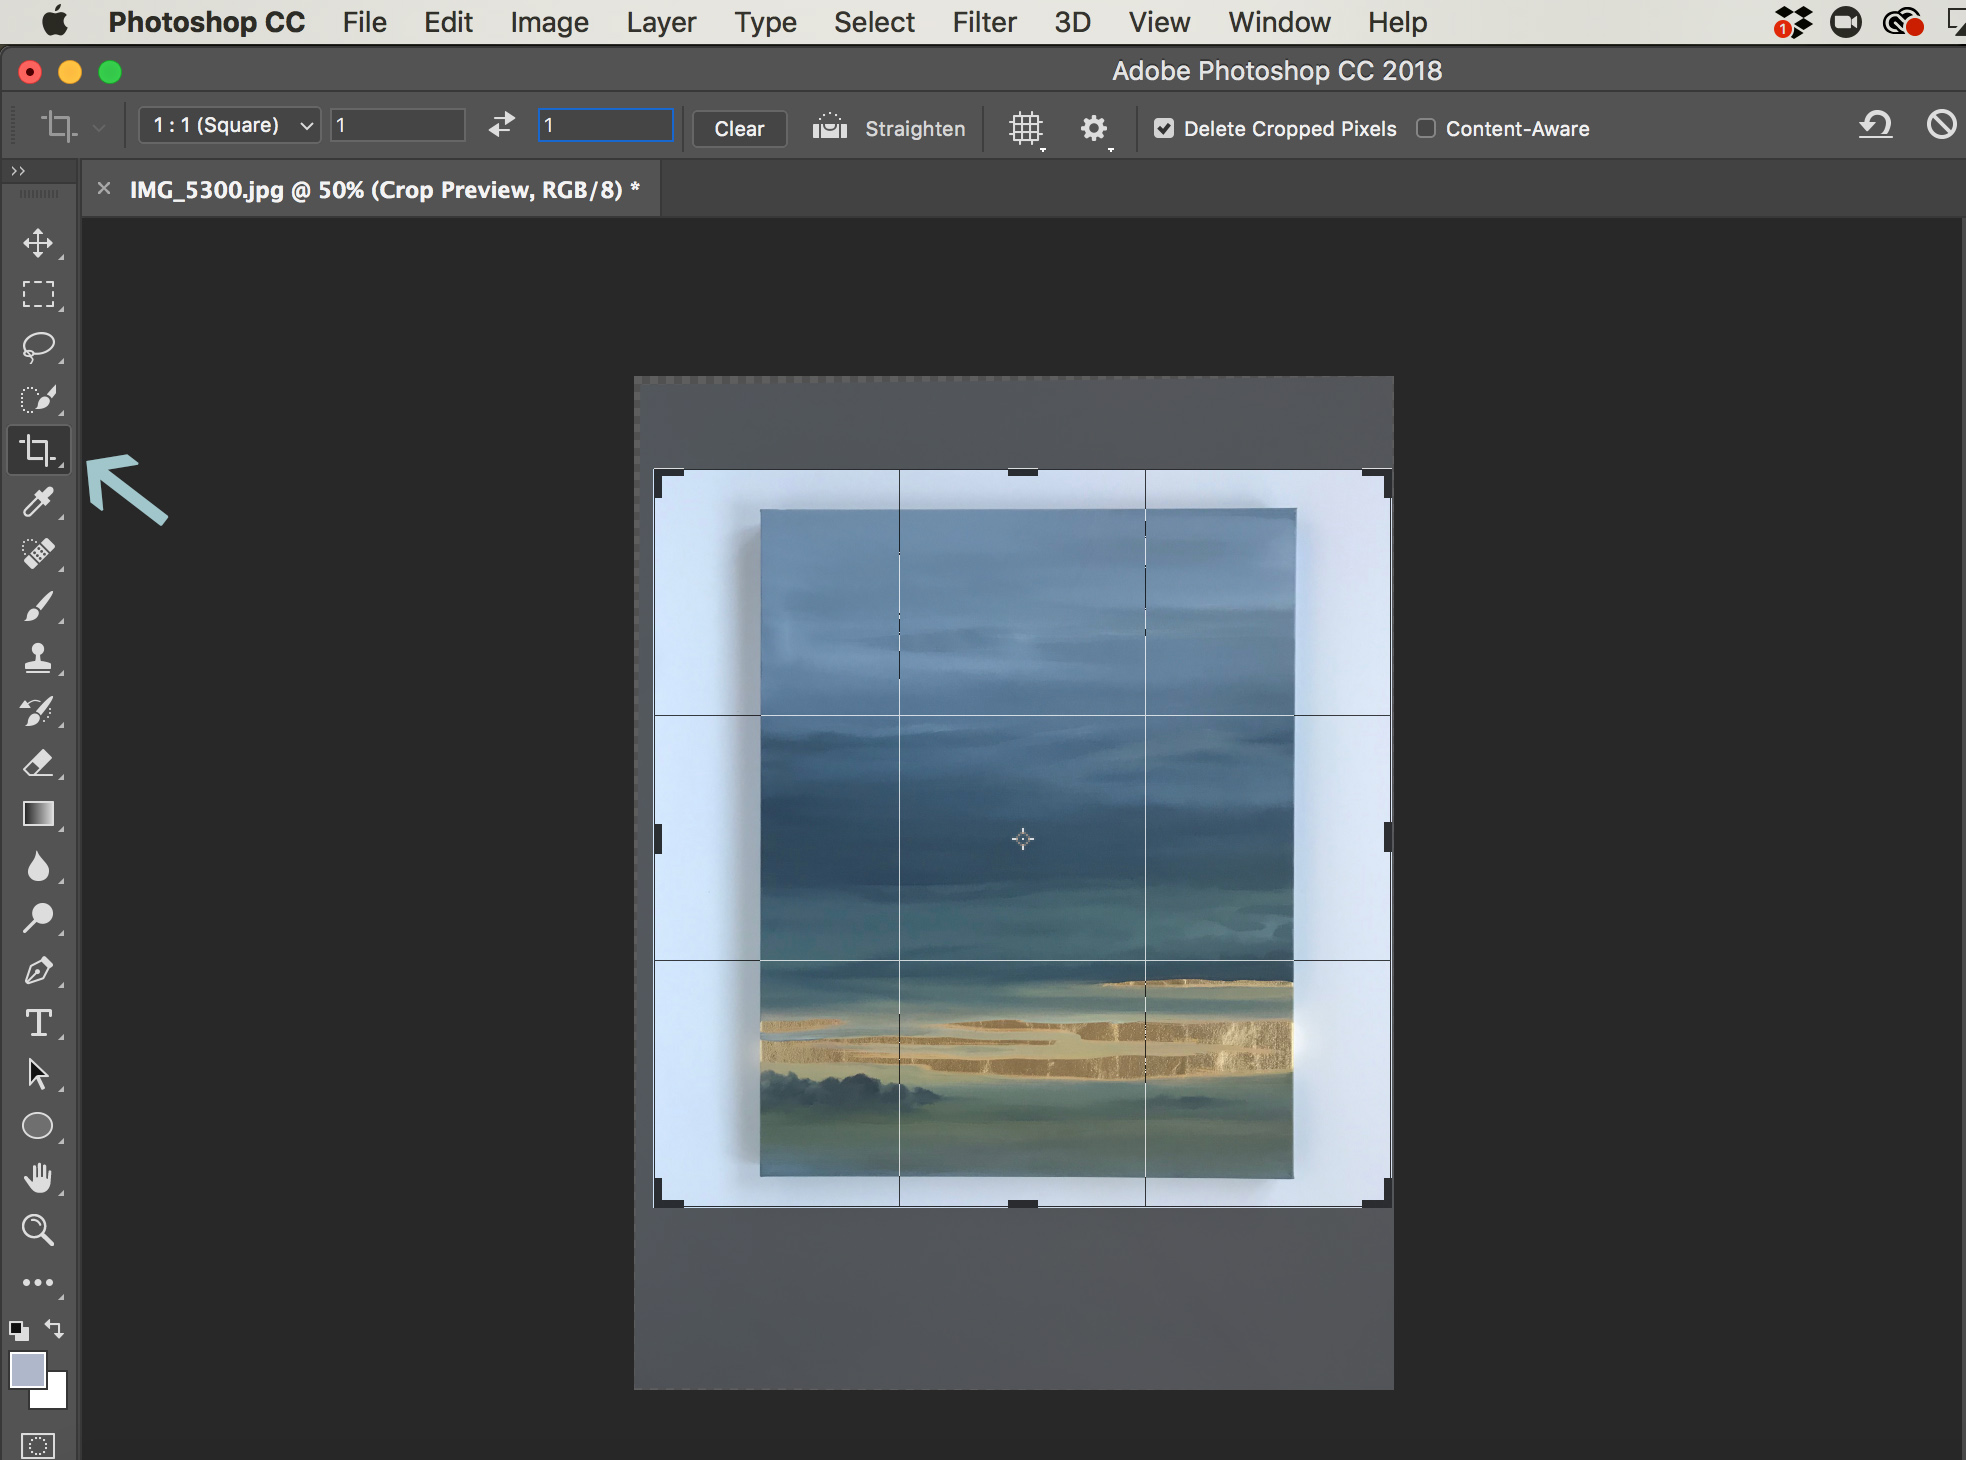
Click on the CROP tool on the left hand toolbar -- see the blue arrow pointing to it.
Set the appropriate ratio for the image -- on the top toolbar. My shop listing thumbnails are displayed as square images -- so I will crop my listing photos square (1:1 ratio) to make sure the painting is centered and does not get cut off on my shop page.
Stretch the grid so that your artwork is centered, leaving some of the white background exposed.
Press the ENTER key to lock the grid and crop your image.
STEP 5: color balance.

Using the CURVES tool -- (Shortcut: type COMMAND + M) or [ Image ---> Adjustments --> Curves ]
Click on the right eyedropper symbol (see blue arrow above) to "Sample in image to set white point"
With eyedropper, click on the white background of your photograph -- try to pick the brightest area (not in shadow), usually the area closest to your lighting source.

AFTER clicking on the white background, the color balance automatically adjusts to set the white point. (Notice the difference between this image, and the one before -- much brighter!)
You can continue to tweak the adjustments if you like -- I tend to use the Brightness/Contrast and Saturation tools to adjustment most often. Or to keep it simple, leave it as it.
And then just SAVE the image!
You now have a clean, professional looking image for your online shop (and social media!) in just five steps!
Note: this is tutorial is best for low-res images for web purposes only. Photographing for high-res reproductions requires a better camera and more even lighting -- I'll save that process for another, more in-depth post.)
For any photoshop pros out there, curious to know if you have any more tips or tricks?